Reaper is a Digital Audio Workstation (DAW) popular for both it's flexibility, capability and affordability. It is my personal DAW of choice.
The default options, however, i do not think are the most ideal for a productive workflow. Here are a few steps you can take when you first setup Reaper to make it a more productive environment for recording and producing music.
Install SWS
The Standing Water Studios extension
SWS is a powerful extension for Reaper that includes hundreds of new actions, a snapshots window, a groove tool, marker actions, loudness tools, a command line interface known as ReaConsole, a warp grid, extensive tempo manipulation, contextual toolbars, region playlists for non-linear play, Live Configs for live performers, using REAPER like an FX pedal, additional zoom features, project management tools, color management tools, automatic colors/icons, LFO generators, cue buss generators, easily previewing and playing takes using the mouse cursor, custom mouse cursors and much more!
Even if you don't end up using any of the really nifty features that SWS provides, there's a pretty good chance that one of the extensions you do end up using in the future will require SWS as a prerequisite, so it doesn't hurt to just get it installed from the get go.
Setup Plugins Folder
Direct Reaper to where your VST files are kept
If you want to use your own virtual instrument files (VSTs) that you have downloaded, you will need to direct reaper towards that file path.
To set this path go to the navigation bar at the top and follow this path.
Options -> Preferences -> VST plug-ins settings
Then, under VST plug-in paths, click on 'Edit path list...' and click 'Add path...'

Select the folder in which your VSTs are stored and you are good to go!
Setup Backup Directory
Never lose progress to a crash again
There is nothing worse than losing hours upon hours of work because Reaper crashes. Usually, this is your fault, since you should be regularly saving as it is, however, we can still mitigate these catastrophes using an automated backup directory!
Why this feature is not enabled by default is beyond me, but if you follow these steps, you will have your projects backing up in no time. Start at the navigation bar and follow this path!
Options -> Preferences -> Project saving
- Enable 'When overwriting project file, rename old project to .rpp-bak'
- Enable 'Keep Multiple Versions'
- Every ___ Minutes 'When Stopped'
- I prefer to do 15 minute intervals, but that's personal preference.
- I chose 'When Stopped' as opposed to 'When Recording' because during recording it might save during a take i will later delete, which can be messy, but again, personal preference.
- Enable 'Save to timestamped file in additional directory'
- Then, just enter the location you wish for your backups to be stored at!
- Optionally, you can also enable 'Save Undo History', but that file can quickly get quite large.
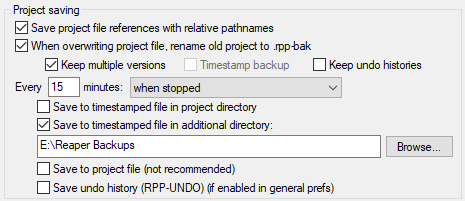
Note: This also backs up reaper projects that have never been saved before as well, which is a nice bonus!
Audio File Sub Folders
Organize your audio files into a subfolder within your project folder
When your project starts growing larger and larger, so does the amount of audio files present in your project directory. We can tidy this up by organizing all of our audio files into one sub directory within the project directory!
From the navigational bar follow this path.
File -> Project Settings -> Media -> Path to Save Media Files
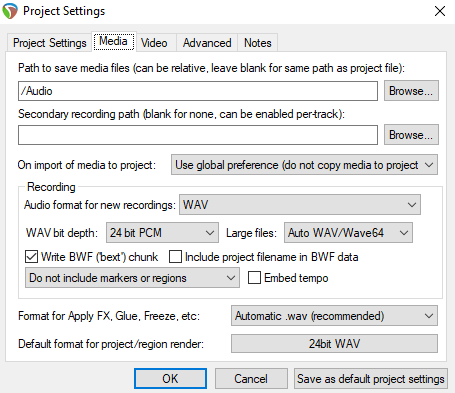
Now, enter a relative path into there, such as 'Audio' or 'Audio Files', click OK and you are ready to go!
Organize Peaks files
Stop your peaks files from quickly cluttering your project and audio directories
Reaper generates 'Peaks' files, which are tiny image files that REAPER uses to display each audio file's waveform.
These can quickly get out of control if not properly organized. So, we will specify a relative sub directory for Reaper to store these files within.
Starting at the navigational bar...
Options -> Preferences -> Media Settings
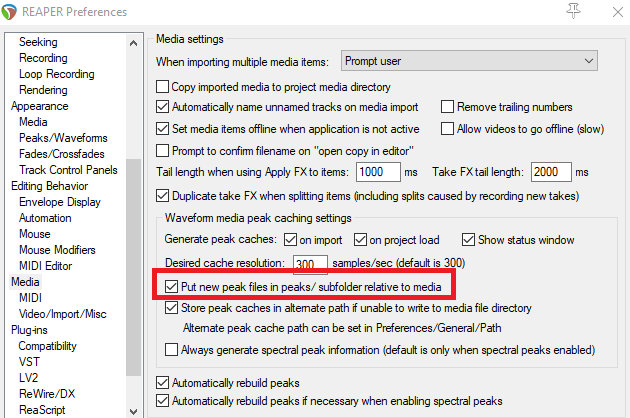
Enable 'Put new peak files in peaks/subfolder relative to media'
'On Save' Options
Options you enable within the save dialog.
When saving your projects, you will be presented with a couple of important options that you should be selecting in most cases.
- Create sub directory for project
- This creates a folder that wraps around your project file as well as your audio folder. This is something you have to do on your own if you don't enable this option, so this is pretty much a necessity in my opinion.
- Copy all media into project directory
- This will ensure that all of the audio files being used by your project will always have a copy available to them, even if the original file gets moved or deleted.

Small Tweaks
Just a couple more things!
We're almost done! There's just a couple more things we need to and then Reaper is all setup for you!
First, starting with the navigation bar, follow this directory.
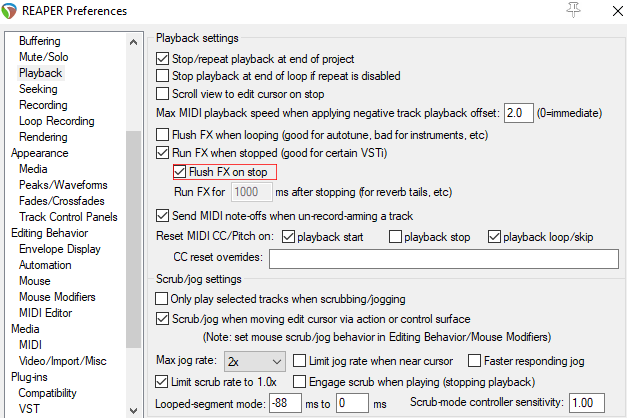
Options -> Preferences -> Playback
- Enable the option 'Flush FX on Stop'. This will stop your instruments with long effects tails from going on for a long period of time after you stop playing or recording.
- This is because if you stop and then immediately go to record again or render the track, you will still have those tails audible at the start of the track.
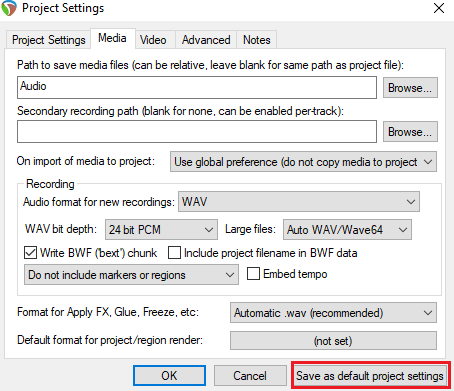
Lastly, navigate to File -> Project settings
- Hit 'Save as default project settings' to make the changes you've made as the default for all new projects you will create!
Words to the Wise
General recommendations and tips!
Don't get stuck in the trap of searching out, collecting and hoarding plugins like a dragon.
You don't want to get ensnared in the tired old loop of searching for "the perfect plugins" before you start actually writing/recording/producing. Get the basics, start creating music and search out what you find yourself needing as you go.
Leave a Comment
Comments
Collection: Loading...No Comments Yet!
Read More!
March 29, 2023
And Most Other Component-Based Frameworks
August 14, 2022
Essential Firefox Extensions for Web Developers
August 9, 2022
Recommended Dungeon World Supplements and Expansion Material
